Geschreven door Eric Cornet
Automate the renewal of TLS certificates with Vault and Cert-Manager
Recently I was asked to give a demo about PKI using HashiCorp Vault. Everyone with some history in Ops knows the painful manual work for renewing TLS certificates, putting it on the server and maybe even restarting your application or web server. This is the main reason why such certificates are often valid for one or even two years. So to show the power of having an API to manage your PKI and request certificates, I created a demo where you can completely automate the renewal of TLS certificates for your app on Kubernetes, using both Vault and Cert-Manager.
Setup
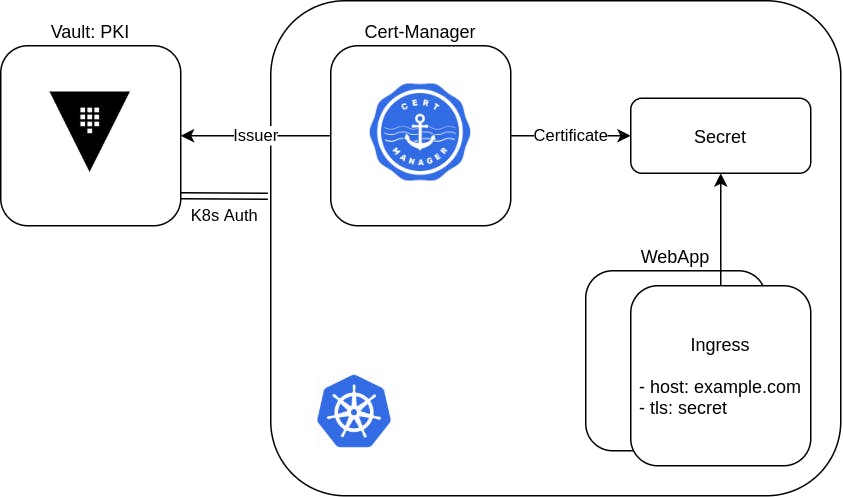
We will use Minikube to create a Kubernetes cluster where we can run Vault, Cert-Manager, Minikube's ingress controller and a webapp, where:
- Vault will give us an API to request certificates for our own PKI.
- Cert-Manager will manage the renewal of our certificate.
- The ingress will expose our webapp on HTTPS.
We will first setup the prerequisites for demoing this certificate renewal automation:
- Create Minikube with ingress addon
- Running Vault server
- Configure Kubernetes Auth Method
- Deploy webapp + ingress
Once the prerequisites are met, we are ready for the demo part which consist of:
- Enable PKI in Vault
- Setup Cert-Manager and request certificate
- Watch cert renewal
Required tools
- Minikube
- Virtual Box. Ingress works pretty nice for Minikube with a vm driver. I use virtual box as a vm driver, but you can also choose other Minikube vm drivers.
- Kubectl
- Helm
Prerequisites
I won't go into all the details of these prerequisites, but discuss only what we need.
Create Minikube cluster with ingress addon
minikube start --driver=virtualbox

minikube addons enable ingress
Setup Vault
To install Vault we use Helm and just follow the docs from HashiCorp.
helm repo add hashicorp https://helm.releases.hashicorp.com
helm repo update
helm install vault hashicorp/vault \
    --set "injector.enabled=false"

# Get vault pod
kubectl get po vault-0
Wait for the vault-0 pod to get healthy and then unseal Vault. We write the Vault key to a file, so we can retrieve it when necessary. (This is clearly very insecure, but ok for this blog.)
# Create Vault unseal key
kubectl exec vault-0 -- vault operator init -key-shares=1 -key-threshold=1 -format=json > /tmp/demo-keys.json
cat /tmp/demo-keys.json | jq -r ".unseal_keys_b64[]"

# Unseal Vault
VAULT_UNSEAL_KEY=$(cat /tmp/demo-keys.json | jq -r ".unseal_keys_b64[]")
kubectl exec vault-0 -- vault operator unseal $VAULT_UNSEAL_KEY
We now have Vault up and running.
We will often want to execute Vault CLI commands and can use the vault-0 pod to execute those. For instance like this:
# Get Vault token from our file
VAULT_TOKEN=$(cat /tmp/demo-keys.json | jq -r ".root_token")

# Get a shell in vault-0 pod with VAULT_TOKEN as environment variable
kubectl exec vault-0 -ti -- /bin/sh -c "VAULT_TOKEN=$VAULT_TOKEN sh"

# Vault CLI example
vault token lookup

# Exit pod
exit
Kubernetes Auth Method
We enable Kubernetes Auth Method and connect our Kubernetes cluster with Vault. For now it is enough to know that
- We will grant the Kubernetes service account issuer access to Vault
- Access is based on the Vault policy pki
- In this pki policy, the endpoints of our PKI engine are defined.
Note that these issuer service account and pki policy do not exist yet, that is fine, we will create them later.
# Prepare Vault CLI in `vault-0` pod
VAULT_TOKEN=$(cat /tmp/demo-keys.json | jq -r ".root_token")
kubectl exec vault-0 -ti -- /bin/sh -c "VAULT_TOKEN=$VAULT_TOKEN sh"

# Enable Kubernetes Auth Method
vault auth enable kubernetes
vault write auth/kubernetes/config \
    token_reviewer_jwt="$(cat /var/run/secrets/kubernetes.io/serviceaccount/token)" \
    kubernetes_host="https://$KUBERNETES_PORT_443_TCP_ADDR:443" \
    kubernetes_ca_cert=@/var/run/secrets/kubernetes.io/serviceaccount/ca.crt

# Policy pki: read access to pki paths
vault policy write pki - <<EOF
path "pki*"                        { capabilities = ["read", "list"] }
path "pki/roles/example-dot-com"   { capabilities = ["create", "update"] }
path "pki/sign/example-dot-com"    { capabilities = ["create", "update"] }
path "pki/issue/example-dot-com"   { capabilities = ["create"] }
EOF

# Create Kubernetes Auth Method role: Grant service account `issuer` access via the `pki` policy
vault write auth/kubernetes/role/issuer \
    bound_service_account_names=issuer \
    bound_service_account_namespaces=default \
    policies=pki

# Exit pod
exit
Webapp with ingress
We will deploy a webapp and expose it with ingress, so it can use our TLS certificate to receive traffic over HTTPS.
For our ingress we use the domain name demo.example.com and a Kubernetes secret demo-example-com-tls where we will store our certificate.
Note: This Kubernetes secret demo-example-com-tls doesn't exist yet, but that is fine, we will create it later.
# Deploy webapp
kubectl create deployment web --image=gcr.io/google-samples/hello-app:1.0
# Create service
kubectl expose deployment web --port=8080
kubectl get service web

# Create ingress
cat <<EOF | kubectl apply -f -
apiVersion: networking.k8s.io/v1
kind: Ingress
metadata:
  name: example-ingress
  annotations:
    kubernetes.io/ingress.class: "nginx"
spec:
  tls:
  - hosts:
    - demo.example.com
    secretName: demo-example-com-tls
  rules:
  - host: demo.example.com
    http:
      paths:
      - path: /
        pathType: Prefix
        backend:
          service:
            name: web
            port:
              number: 8080
EOF
This ingress will get an external IP address (this can take some time) and since we use Minikube with a vm driver, this external IP address is equal to the IP of the vm.
# Show ingress external IP and Minikube's IP
kubectl get ingress
minikube ip
To make the demo more pretty, we will add this ip to our /etc/hosts file so we can browse to our domain.
Edit your hosts file with sudo vi /etc/hosts, like this:
# PKI Demo
192.168.99.128 demo.example.com
You can then browse to https://demo.example.com, or use curl to go to our webapp.
The ingress controller will serve a default self-signed certificate since we did not configured any certificate yet.
With curl we can bypass this simple:
# Ignore invalid cert
curl --insecure https://demo.example.com
# Show tls handshake details
curl -kivL https://demo.example.com
Demo: Automate Certificate Renewal
What do we have so far?
We have Vault running and connected to our Kubernetes cluster and we have a webapp exposed via ingress.

We are now ready to automate certificate renewal by:
- Enable PKI in Vault
- Setup Cert-Manager and request certificate
- Watch cert renewal
Enable PKI in Vault
We will enable PKI in Vault. For most settings the default values suffices for this demo, we only:
- Give the root CA certificate a name which we can recognize: Demo Root Certificate Authority
- Write root CA certificate to a file
- Create a Vault pki role
With this Vault pki role we define what kind of certificates we are allowed to request, in this case: certificates for example.com and all it's subdomains and, most importantly, with a maximum time to live of 3 minutes: max_ttl=3m.
# Prepare Vault CLI in `vault-0` pod
VAULT_TOKEN=$(cat /tmp/demo-keys.json | jq -r ".root_token")
kubectl exec vault-0 -ti -- /bin/sh -c "VAULT_TOKEN=$VAULT_TOKEN sh"

# Enable PKI secret engine
vault secrets enable pki

# Generate root CA (and write to file)
vault write -format=json pki/root/generate/internal \
    common_name="Demo Root Certificate Authority" > /tmp/demo-root-ca.json
cat /tmp/demo-root-ca.json

# Configure pki api endpoints
vault write pki/config/urls \
    issuing_certificates="http://vault.default:8200/v1/pki/ca" \
    crl_distribution_points="http://vault.default:8200/v1/pki/crl"

# Create `pki` role to create certificates for example.com and all subdomains and with a maximum time to live of 3 minutes.
vault write pki/roles/example-dot-com \
    allowed_domains=example.com \
    allow_subdomains=true \
    max_ttl=3m

# Exit pod
exit
Now that we have an api to request certificates, we can start using it.
Cert-Manager
We will deploy Cert-Manager and configure Vault to be the issuer of the certificates. When that is done, we can define our certificate and Cert-Manager will request and renew the certificate when it will expire.
We install Cert-Manager v1.3.0 with Helm and just follow the docs from Jetstack. This will install Cert-Manager in a separate namespace and also install it's custom resource definitions CRD's.
kubectl create namespace cert-manager
helm repo add jetstack https://charts.jetstack.io
helm repo update

# Install Cert-Manager
helm install cert-manager jetstack/cert-manager \
  --namespace cert-manager \
  --version v1.3.0 \
  --set installCRDs=true

# View pods
kubectl get pods --namespace cert-manager

# View CRD's
kubectl get customresourcedefinitions.apiextensions.k8s.io
Define Issuer And Certificate
From the CRD's we will use Issuer and Certificate.
First with CRD Issuer, we can define the issuer of the certificates. Recall the Kubernetes Auth Method configuration, where we granted the Kubernetes service account issuer access to our pki api endpoints. Hence we create a service account issuer in Kubernetes. We then define the Issuer CRD with a.o.:
- Name vault-issuer
- Connect it to the Vault server http://vault.default (to the pki/sign/example-dot-com uri in particular)
- Authenticate via the token of our issuer service account
# Create service account
kubectl create serviceaccount issuer

# Token of service account `issuer`
ISSUER_SECRET_REF=$(kubectl get serviceaccount issuer -o json | jq -r ".secrets[].name")

# Define issuer
cat <<EOF | kubectl apply -f -
apiVersion: cert-manager.io/v1alpha2
kind: Issuer
metadata:
  name: vault-issuer
  namespace: default
spec:
  vault:
    server: http://vault.default
    path: pki/sign/example-dot-com
    auth:
      kubernetes:
        mountPath: /v1/auth/kubernetes
        role: issuer
        secretRef:
          name: $ISSUER_SECRET_REF
          key: token
EOF

# Show issuer
kubectl get issuer
Second, with CRD Certificate, we can define our TLS certificate, with:
- Name demo-example-com
- Name of the Kubernetes secret, where the certificate needs to be stored: demo-example-com-tls
- Specify at which issuer the certificate needs to be requested: vault-issuer
- Define properties of our certificate:
undefined
# Define certificate
cat <<EOF | kubectl apply -f -
apiVersion: cert-manager.io/v1alpha2
kind: Certificate
metadata:
  name: demo-example-com
  namespace: default
spec:
  secretName: demo-example-com-tls
  issuerRef:
    name: vault-issuer
  commonName: demo.example.com
  dnsNames:
  - demo.example.com
EOF

# View certificate CRD
kubectl get certificate
Cert-Manager can now request this certificate at our issuer. Once that is done, you will see that a new secret is created.
# See the request in the events
kubectl describe certificate demo-example-com

# New secret
kubectl get secrets demo-example-com-tls
We are done! Let's check if we can see our new TLS certificate.
Certificate renewal
Small recap on what we have now:
- Vault exposing an pki api
- Cert-Manager using this pki api to request a certificate
- the certificate is stored as a Kubernetes secret demo-example-com-tls
- Ingress gets demo-example-com-tls and uses it to enable TLS on our webapp
When we now browse to https://demo.example.com, or use curl to go to our webapp, we still get an invalid certificate. But when we look closer to the certificate, we see that it is a certificate from Vault.
For Firefox, go to:
- Advanced... > View Certificate
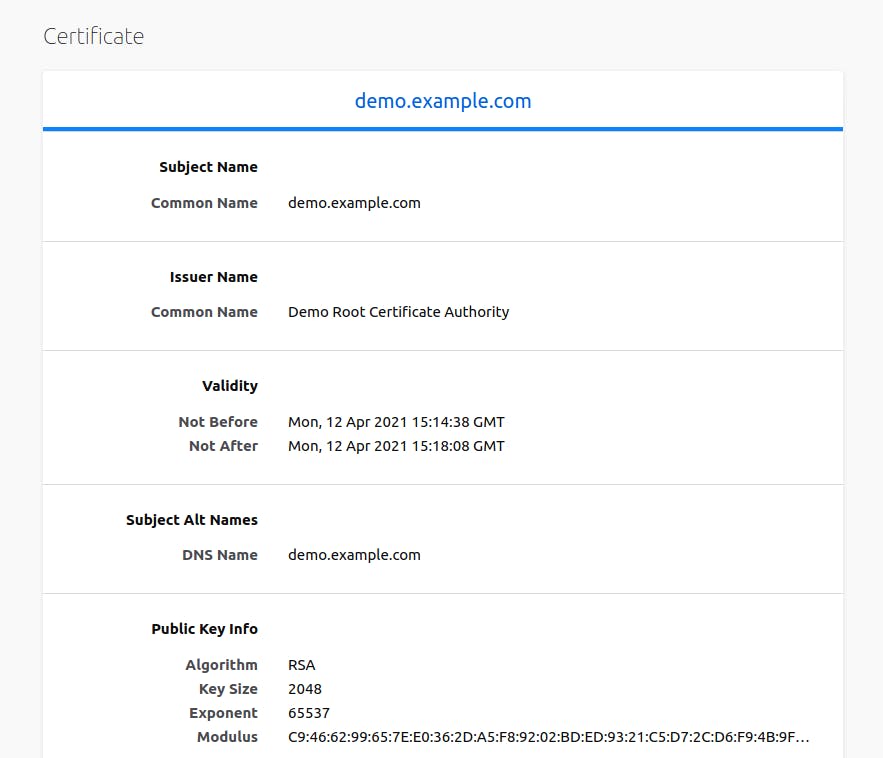
Note that:
- CN: demo.example.com
- CA issuer: Demo Root Certificate Authority
- valid from and valid to is a difference of only 3m30s.
Remember we defined Vault to only issue certificates with 'max_ttl=3m'. Apparantly Vault adds another 30 seconds to it, but we don't care for now. The cool thing is that the certificate needs to be renewed very soon. So we wait some time, refresh our browser and see that it has new values for valid from and valid to. The certificate is renewed, cool!
So what happened with all the painful manual work of renewing your certificate?
It is automated by Cert-Manager who leveraged the PKI api of Vault. Cert-Manager monitors the TTL of the certificate and renews the certificate for you at the defined issuer, which is Vault in this case. Other possible issuers are Let's Encrypt (nice demo) and Venafi which both can be used for internet exposed TLS endpoints. Vault suites more the use-case of intranet exposed endpoints with certificates of an internal PKI managed by Vault.
Round up, add root CA to browser
To finish the demo, and convince also the non techies, we can add the Vault root CA to our browser so the certificate is validated properly and we get a valid TLS padlock.
Recall that, when we created the root CA, we stored it in a file in the Vault container. We first copy the root CA to our local machine.
# Copy root CA json from container to local machine
kubectl cp vault-0:/tmp/demo-root-ca.json /tmp/demo-root-ca.json
# Extract the root CA in pem format
cat /tmp/demo-root-ca.json | jq -r .data.certificate > /tmp/demo-root-ca.pem
cat /tmp/demo-root-ca.pem
Then import it into our browser.
For Firefox, go to:
- Preferences > Privacy & Security > Certificates > View Certificates > Authorities > Import... > enable: "This certificate can identify websites"
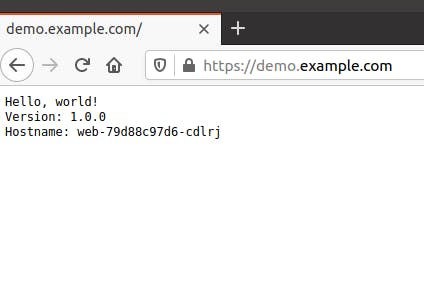
Now browse to 'https://demo.example.com' again and we will have a valid HTTPS connection and our TLS padlock!
References
These guides helped me to create this blog:
Thank you for reading my blog and I hope I have helped you get setup with using Vault and Cert-Manager to automate the renewal of your TLS certificates. You can reach out to me on LinkedIn of by e-mail if you have any questions.
Geschreven door CINQ