Geschreven door CINQ
Building our own augmented reality app
Welcome back! In our previous blogpost: “Augmented reality deep dive,” we wrote about our hackathon and its results. This blog will explain what we did after that, and where we stand now. But before we continue, let’s recap what we are trying to achieve:
We would like to build an app that is capable of recognizing a specific building (through the camera). Once this happens it augments the screen with text, photo, video or other audiovisuals.
Choosing an augmented reality framework
In the previous blog we gave several directions in which we could expand our research. We choose to look into existing AR frameworks, because this seemed to be the most promising area. There are a lot of AR frameworks out there, but pretty soon we found the one that matched with our use case: Wikitude.
The main reason we chose this framework is the fact that it supports scene tracking. For people unfamiliar with this term: besides recognizing (small) objects it can also recognize scenes (or big objects). As we are trying to recognize a building, this is a perfect fit for our use case. Furthermore, the framework supports cross-platform development. So we do not have to develop a separate app for Android and iOS. And last but not least, you can download a trial version for free. This will add a watermark to the app, but that is fine for early development and testing.
Besides recognizing the building, there is also the user interface part. Remember that we would like to show a text, photo or video when having the building on the screen. We chose to use Wikitude in combination with Unity. This was the logical choice because one of the developers already has quite some experience with this platform. We will get back on the user interface in a few paragraphs.
Scene recognition & point clouds
So how does this scene recognition work? How does it know what building it should recognize? Great questions! This is actually quite simple, because Wikitude does the heavy lifting for you. First, you have to take a lot of pictures of the building that you would like to recognize. Then you upload them to their servers and it will return something called a point cloud. So the input is photos and the output is cloud of points in 3D.
To understand the concept of a point cloud a bit better, please have a look at the two pictures below. Figure 1 shows the building from the top. Figure 2 show the building from the front. In both pictures you easily recognize two planes of the building. Hopefully this helps in understanding the concept of a point cloud.
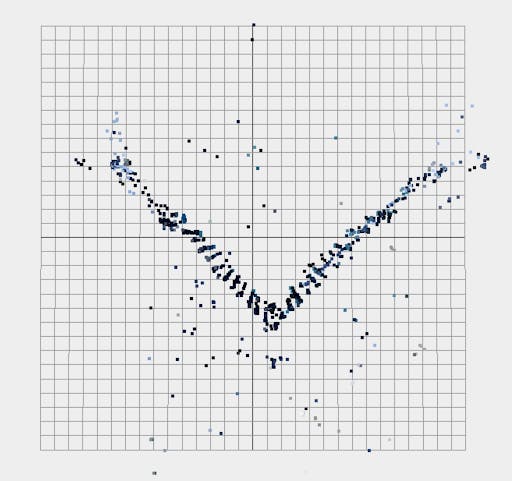
Figure 1 – the building from the top
Figure 2 – the building from the front
Once you have the point cloud, you can start recognizing the object from the photos (in our case the building). The framework will take the input from the camera (from your phone) and will continuously create point clouds from this. Then it will try to match the point cloud from the camera with the stored point cloud (of the building). When there is a match, we have a recognized building!
What’s next?
With the heavy lifting done in terms of recognizing the scene or objects, all that is left, is to augment the screen with something. For our demo/prototype we wanted to try a series of things such as:
* show text
* show photos
* play video
* show a 3D model
* have interactions (such as starting a call or opening a website)
In order to accomplish this, we decided to make a demo app showing these capabilities. We took our own office building as a subject (to recognize) and display some basic information about the office and our company.
In part 3 of our Augmented Reality adventure, we will show you how that went and what the app looks like! Stay tuned!
Geschreven door CINQ